

How to configure a WiFi Router with Ethernet Xpress

Since I struggled for a bit to get Ethernet Xpress to work properly over WiFi and couldn't find any documentation online, I'm writing this blog on how to configure a WiFi Router with PPPoE on a WAN port.
The hardware setup
The fiber optic cable that runs from the pole goes into a plastic box. Inside the plastic box this optical fiber is spliced to a patch cord. The other end of the patch cord has a connector that goes into a media converter. The media converter also has a standard LAN port (RJ45 / 8P8C).
I plugged a short LAN cable from the media converter to my Asus DSL-N12U_C1 Wireless ADSL modem router.
Now, the configuration
My WiFi Router runs AsusWRT, which has loads of easily configurable features. However, it doesn't have a dedicated WAN port. But it's simple enough to assign one of it's four LAN ports to WAN, as described in point 3(b) below.
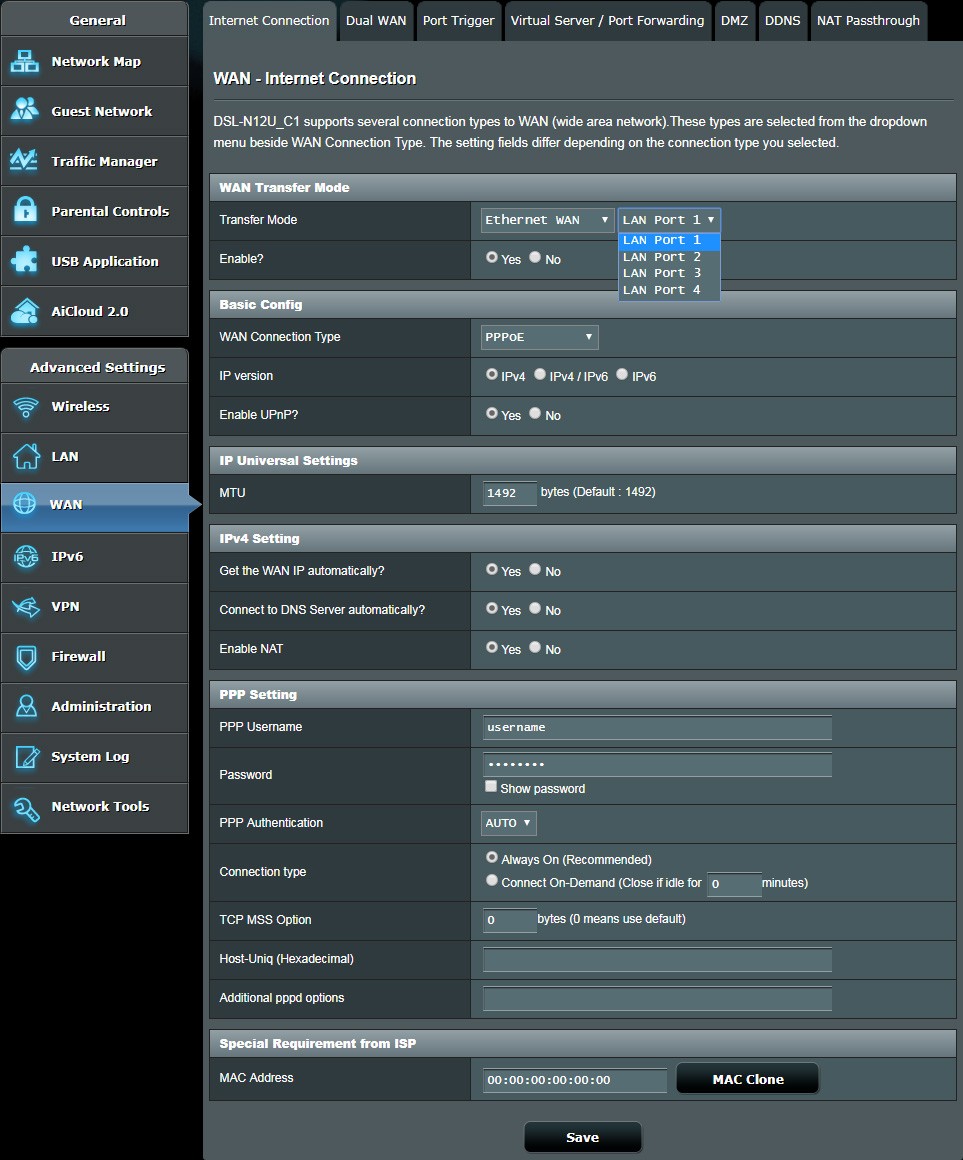
Click image to zoom
- Click on "WAN" in the left menu
- By default, you will see the first tab, titled "Internet Connection"
- In the first sub-section titled "WAN Transfer Mode":
- Select "Ethernet WAN" as the "Transfer Mode"
- You will now see a list of the LAN ports. Choose the one that you'll be using to connect the LAN cable from the media converter
- Enable this connection by selecting the "Yes" radio button, next to "Enable?"
- Under "Basic Config":
- Change the "WAN Connection Type" to "PPPoE".
- The "IP version" is "IPv4" (at the time of writing this post)
- Enable UPnP (Select the "Yes" radio button)
- Under "IP Universal Settings", leave the "MTU" setting at it is (1492 by default)
- Under "IPv4 Settings":
- Select "Yes" for "Get the WAN IP automatically?"
- Select "Yes" for "Connect to DNS Server automatically?"
- Select "Yes" for "Enable NAT"
- Under "PPP Setting":
- Enter your PPP Username, as provided by your ISP (Ethernet Xpress or any other)
- Enter your Password
- Set "PPP Authentication" to "AUTO"
- For "Connection type", select "Always On"
- Leave "TCP MSS Option" as it is (0 by default)
- Leave "Host-Uniq" empty
- Leave "Additional pppd options" empty (unless instructed otherwise by your ISP)
- Under "Special Requirement from ISP"
- You would generally leave the "MAC Address" empty, but here is where I had trouble. Read more below.
- You would generally leave the "MAC Address" empty, but here is where I had trouble. Read more below.
Ethernet Express locks your connection to the first MAC Address that you connect from (which, in my case, was my laptop's LAN adapter port.) I wasn't aware of this (due to lack of documentation) and this led to a lot of wasted time. Web pages opened if I connected the LAN cable directly from the media converter to my laptop, but refused to connect when the LAN cable was plugged from the media converter to the router.
The modem's system log didn't help much either. The error was quite vague - "Remote message: Login incorrect".
But then - lightbulb.
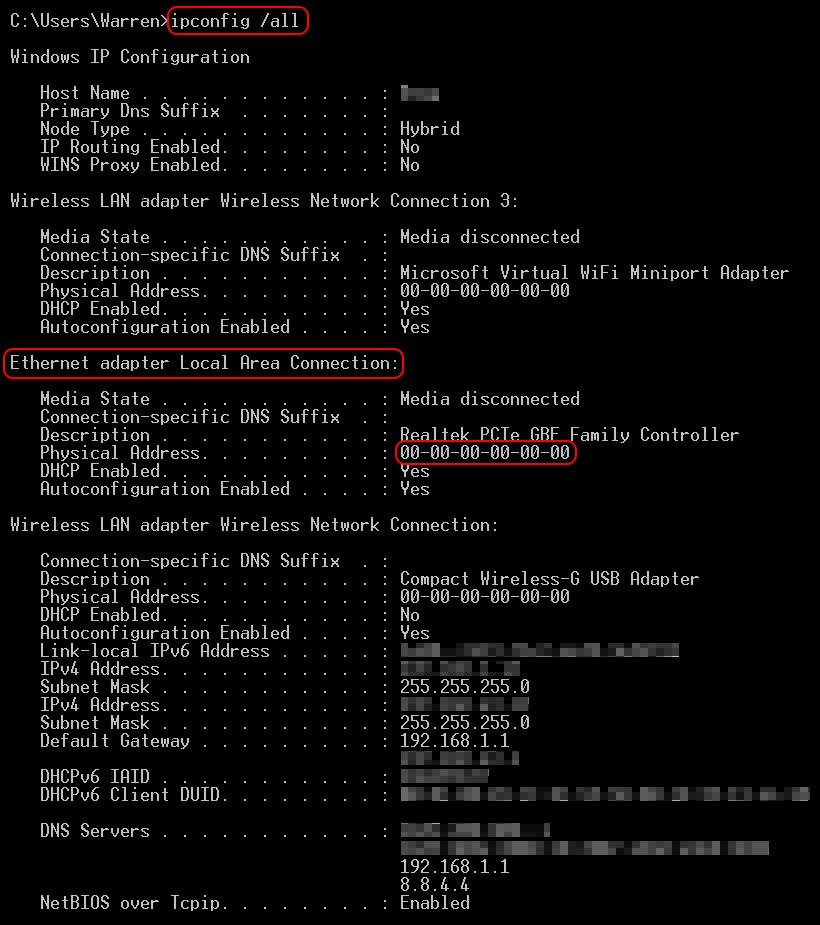
I fetched my laptop's LAN port MAC address by opening a command prompt window (Click Start and type cmd) and typing in the command:
ipconfig /all
This gave me my Ethernet (LAN) adapter's Physical Address (MAC address). I just copied this and pasted it into the "Mac Address" setting of the "Special Requirement from ISP", formatting with colons (:) instead of dashes (-), as required.
And my internet connection was now live through my Wifi Router!
Click image to zoom
Note that I have changed the MAC addresses to all zeroes, in the screenshot above. The actual MAC address will contain six groups of two hexadecimal digits each. Hexadecimal digits include the symbols 0-9 to represent values zero to nine, and A, B, C, D, E, F to represent values ten to fifteen.